
My history with Star Raiders only exists because I don’t have one… Which is a potentially profound but ultimately nonsensical way to start a deep-dive into one of the most influential games of all time, so let me explain! I’d heard of it over the years since, of course, but an Atari 8-bit home computer exclusive from 1980 was always going to be easy to miss at the time. My Atari 2600-owning best friend was never likely to pick it up when it appeared on there in 1982 either – having to use the overlaid twelve-button Video Touch Pad it came with would have put him right off before he even looked at the game itself, not to mention all those instructions! In the last hour or so as I write though, I’ve realised I’ve actually owned that version on the Atari Flashback Classics Vol. 1 compilation on PlayStation 4 since 2018, and I imagine I simply fired it up when I first got it, didn’t instantly understand it, and didn’t go back, so I’m no better! I did already know I had the Atari 5200 version on 2022’s Atari 50: The Anniversary Collection for Nintendo Switch though, but same story, and it took me eventually finding the original version to give it any proper attention, so let’s go all the way back to that…

I finally got my hands on The [Atari] 400 Mini back in May 2024, having been a good boy, holding off until my birthday that month (because I’m always a nightmare to buy for)! Atari’s 8-bit computers have always been a bit of a mystery to me, so I was really over the moon to get into it, having a blast discovering the twenty-five games baked-in on there, as well as finding a few classics of my own, and a bunch of Atari 5200 titles that are (mostly) supported on top. Anyway, of the games that came with it, there were new versions to me of old favourites like Miner 2049er, Bruce Lee and Hovver Bovver, then arcade ports I’d never played of classics like Berzerk, Crystal Castles and Millipede, but as great as all that was, what really fascinated me was what I’d never played anywhere else before, like Wavy Navy, Elektra Glide, Caverns of Mars and a game I wasn’t even aware existed called Star Raiders II. Now, I’ve a feeling this might go longer than I’m currently intending so I’m not sure if I’ll make it back to getting into the 1985 sequel here, so let me just say I immediately liked its strategic space combat sim leanings enough to find the manual, plug in a keyboard, and then I really started enjoying it, to the point I decided I should stop and experience the original first… And the best part of a year later, I still haven’t been back!

This thing honestly blew me away! Without getting too far ahead of myself, it was just so immersive, mixing depth and strategy with accessibility and simple arcade fun, and to think I was still being amazed by a Pong knock-off on our knock-off Atari console when it was first released! And I was also seeing a lot of Elite in there, a top ten all-time favourite of mine for many of the reasons I’ve just mentioned, as well all sorts of other stuff like the old Star Trek games I loved playing on my VIC-20, and Sentinel and Codename MAT on the Spectrum, and a bit later, Wing Commander too. It was such a revelation and it had been hiding in plain sight for years if I’m being generous to myself, or decades in reality! Got there in the end though, and I’ve definitely been making up for lost time since I did, which is as good a place as any to jump into the game itself. As for its own influences, we’re clearly talking Star Trek and Star Wars, and usual suspects like 2001: A Space Odyssey and THX 1138, and there’s a strong hint of Battlestar Galactica too, which would have still been airing for the first time as Star Raiders was being put together. And the man behind its development was Doug Neubauer, who’d moved to Atari from National Semiconductor after they stopped working on home computers, and was a key player in the Atari 400 and 800 hardware design, particularly its POKEY sound chip. When 1979 came around there wasn’t a lot happening on that front at Atari either, and having come across an already ancient Star Trek mainframe text adventure and decided it was boring, he turned his hand to software, and with some previous form programming starry backgrounds and the inside scoop on creating sci-fi sound effects, he came up with Star Raiders, which was released on Atari’s home computers in March 1980.

I’ve already mentioned a couple of places it then appeared later on but like the sequel, I’m unlikely to be able to get into them in much detail here later on, so I’ll just do a quick summary now instead… After the Atari 2600 version in 1982, which might be stripped right back and definitely isn’t the best way to play the game but is still outstanding in its own right, there was the Atari 5200 version in 1983. This was the first time all twelve of its luxurious game-pad buttons were ever put to use in a single game, and now they’ve been properly mapped to modern controllers (and in a very intuitive and playable way) on the aforementioned Atari 50 compilation. Based on pretty much the same hardware running the game otherwise, this port is effectively the same game, but with those gorgeous dynamic borders (pictured above) added on top, the Atari 50 version of it is probably is the best way to play anywhere today, although I have become really fond of the keyboard controls of the original – they feel more realistic somehow, adding to the immersion! While not strictly a sequel – more of a successor – I also want to quickly mention the technical masterpiece that is Douglas Neubauer’s Solaris on the Atari 2600 from 1986. It has you in the Star Raiders universe trying to reach the titular planet, with recognisable but far more streamlined and arcade-like gameplay mechanics that both suit the system perfectly and also wring out every last drop of performance from it, and certainly ranks as one of its all-time greats! Back with Star Raiders, in 1988 there was also an Atari ST version but I was way too busy with Elite on there to even notice it after I got mine a few months later. It’s a very lazy update too, and just doesn’t feel good to play, as well as having a turning on your shield sound effect that’s one of the most ear-piercing things I’ve ever heard!

I will come back to another game on the 2600 also considered something of a sequel but for now we’ll stick with the original 400/800 version, where we find ourselves part of the elite unit of the Atarian Starship Fleet – The Star Raiders! The instruction book goes on to explain that the treaty between the Atarian Federation and the Zylons (see, told you Battlestar Galactica!) has broken down into a state of war, with the Zylons now threatening to eliminate humanity as we know it, right across the galaxy, which is about to become your battleground! Starting out as a Novice, then going through the ranks of Pilot, Warrior and Commander, your primary mission is to destroy all Zylon starships without getting destroyed yourself. On top of that, you also want to complete your mission in as little time as possible, using as little energy as possible, and without allowing any friendly starbases to be destroyed. All of this contributes to your end of mission rating, which confusingly includes the ranks I’ve just mentioned, and also acts as a weighting factor to how many points (and thereby which rating) you’re awarded, ranging from Galactic Scow Captain or Galactic Cook for a disastrous mission, then through Rookie, Novice, Ensign, Pilot, Ace, Captain and a bunch of others right up to Star Commander. The equations behind this ranking are all covered in the manual too, which was a typically weird thing for Atari to include, but hey, they were writing the rules at this point so good on them! It’s interesting to see how all the factors like time taken, energy used, enemies killed and all the other stuff we’re about to get into factor into the ranking though, and as such can be prioritised when you get into more advanced play, but we’ll get to all that shortly!

The game takes place from a first-person viewpoint, from inside the cockpit of your starship, where you’ve got all your critical instruments and gauges and readouts, as well as your front and rear views and various charts and scanners and stuff, all of which I’ll try and cover, together with how it plays and everything else, by taking you through an actual game together. I’ll flit between the various difficulty levels and cover the differences between them as we go too, which will also let me go through the basics in relative peace, but however we begin, we find ourselves dumped in the middle of outer space, where what we do next is entirely up to us… Although pressing S to turn on the shields (indicated by a blue hue to the screen versus the regular pitch black of space) is probably a good idea, and so is having a quick look around to make sure there’s no stray meteors about to collide with you because unless you’re on Novice, where your shields will prevent damage from them too, getting hit by one now would not be conducive to getting a decent ranking at the end! While you’re doing that though, do take a moment to admire the view, which might look like a load of white dots on a bit of black screen, but in 1980 this would have been a miraculous new 3D world you’d just become a part of! Closer to hand, let’s have a quick look around the cockpit before we head off, where we have the luxury of both forward and aft views, again, both accessible by pressing F and A respectively, and beneath these views we’ve also got a bunch of important instruments to guide us on our travels through the wonders of 3D space…
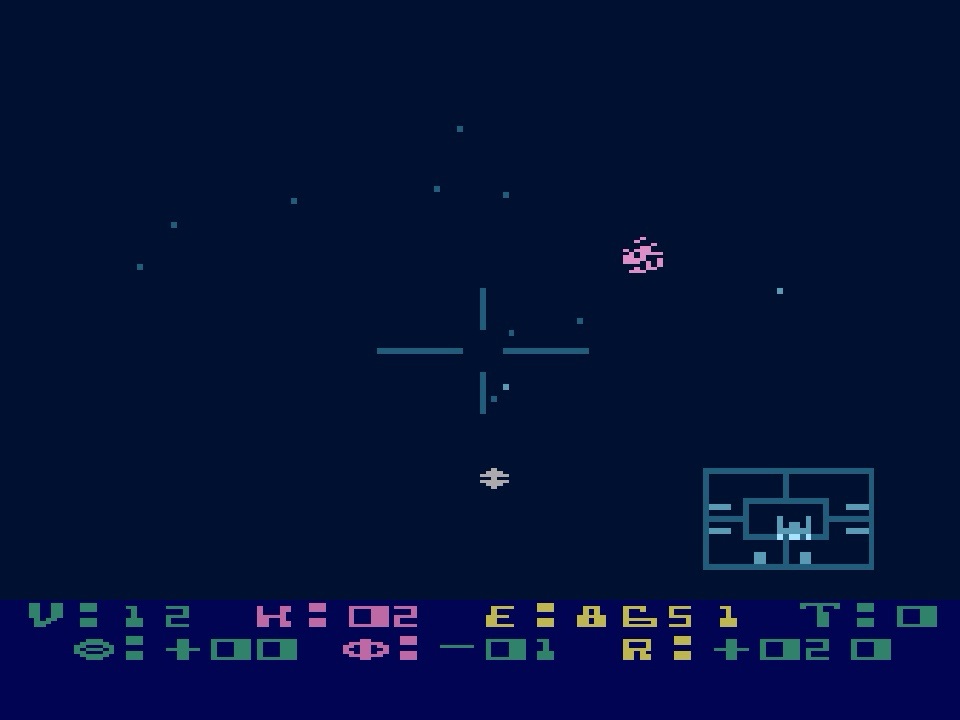
They start simple enough though, with V for velocity, measured in metrons per second (the first of several bespoke units of measurement here), and this is controlled by the 0-9 number keys, where number 6 is about the target cruising speed of around 12 metrons per second for the optimum energy usage, which is indicated just along the screen by E for energy, and is going to get properly drained if you find yourself in hot pursuit (or more likely on the run) when you’re doing anything above that, all the way up to 43 metrons per second. You start with 9999 units of energy though, so you’ll be going some on the lower difficulties to have to worry too much about fuel efficiency, or the constant drip-drip demands of your shield and weapons, when getting shot back at is going to do your energy far more damage, although that’s still tiny compared to hyperwarp jumps, which I’ll come back to when we’re ready to get on our way in a second… In the meantime, back to our instruments, we have K showing number of kills you’ve achieved and T for target selected, completing the top row, and allows you to manually cycle enemies, always identified by numbers, or, indeed, a friendly starbase which I’ll also come back to. Oh yeah, the T becomes C if you have your tracking computer switched on, which is something else you probably don’t want to bother about too much at lower difficulties but will automatically track a target from front to back and back again, switching displays for you, but this can get really confusing with enemies already front and rear, and potentially dangerous too if you find yourself in their crossfire, so better left until you properly know what you’re doing! Anyway, you’ve also got to get your head around the bottom row of instruments first, which combine to help you track your current target, where a Greek Theta symbol (if you squint!) shows your horizontal offset in gradons, a Phi symbol shows your vertical offset in gradons, and there’s an R for range which shows how far away you are, either front or back as indicated by a plus or minus next to it. And while it all sounds horrendous, you just want to turn then move forward until all the numbers are zero, meaning there’s a Zylon right in your face!

Before we look at what to do when there’s a Zylon right in your face, we need to work out where they’re likely to be in the first place, and that’s where one of our next most important view comes into play – the Galactic Chart. This is an eight by sixteen grid representing the entire galaxy, where each square is a sector that could contain one of your starbases or an enemy squadron, or could just be empty bit of nothing. The number of starbases vary by difficulty, and obviously so does the enemy you’re trying to protect them from, but as well as looking out for them, they’re also where you’re going to head when you need to refuel or get repairs, which, once you’ve “targetted” them as mentioned previously, you’ll need to dock with by getting as close as possible without hitting its bright orange rhombus superstructure, then slowing to a stop so its cute little shuttle-droid-thingy can fly out and sort you out… Takes a bit of practice but it’s way easier than doing it in Elite before you have enough cash to buy a docking computer! Back on the chart, starbases are shown by a little asterisk-type symbol, while you’re a white dash, your selected destination is another dash, then there’s three types of enemy formation, where three lines arranged on top of each other means a three-starship task force, an arrangement of four lines means a fleet of four, and a little plane symbol means a patrol of one or two. I noticed something interesting about their behaviour too when I was grabbing the screenshots you can see here using RetroArch on my laptop (which was a right pain because I was too lazy to reassign its hotkeys, which seemed to precisely mirror every single Star Raiders control!)…

Anyway, I had it on fast-forward or whatever it’s called on there so the enemies would spread out from their starting positions a bit before I took a pic, and I noticed how they’d select a single, vulnerable starbase and collectively start to move towards it, all at different speeds depending on their formation type, before joining together into a convoy en route, then surrounding it before attacking en masse and splitting up before moving to target another. And it’s always one at a time, creating an attack force from those squadrons most suitably positioned, which I get is probably mostly to stop you being instantly overwhelmed on anything but the lowest difficulty and having a totally miserable time, but is also a fascinating bit of early strategic thinking from video game AI that’s really impressive when it’s sped up like it shouldn’t be and you’re passively watching it all happen! Assuming you want to fight back though, you ideally want to cut these enemy swarms off at the pass and add them to your K for kill gauge long before they reach a starbase but should they get there first, you’ve got about a hundred centons (a minute) to go and break their stranglehold by taking out at least one of the surrounding squadrons or it’s doomsville for the base, and for you too if you were planning on making use of it in your own moment of need later on! For now though, pick your target sector, press H for hyperwarp, and off you go, assuming you’ve got enough energy – remember earlier I said this takes loads? Well, it does depend on how far you’re heading, with one sector only using 130 units of your 9999 total (which also equates to more or less the damage done by a single photon hit from an enemy) but if you want to travel twenty-three sectors right across the map, for example, then that’s going to cost you 2500 units, so as you can imagine, you need to have an eye on where those pesky Zylons are going, even at normal speed, then anticipate what the next lot might be planning, and the next, and plot your route accordingly, using the least possible energy if you want to rank well at the end of the mission.

And even more so a couple of difficulty levels in because if you’re not careful, by the time you come out of hyperwarp, they’ll be long gone! This is where the star date indicator on this screen might come in handy, and where you’ll also find the jump energy cost calculated for you, as well as your Damage Control (DC) indicator, which for some reason I forget is hidden away here every single time I want it! Just to quickly cover that before we get into the fun part of actually taking damage, it’s letters (PESCLR) representing your own Photon guns, Engines, Shields, Computer, Long-Range Scan and Sub-Space Radio (both of which I’ll try and remember to return to), and they’re all colour coded with blue for okay, yellow for damaged and red for destroyed. And if you have a rubbish memory like me, you tend to notice the damage done (which I guess is based on percentage chances after you get hit) without any gauges telling you so, with guns not firing, scanners going screwy, shields flickering, Greek symbols disappearing and so on. The engines, however, will continue to operate on a backup system even if totally destroyed, which was a genius move because that’s obviously likely to occur in the middle of a firefight, and like losing your guns, leaves you pretty much screwed but with the tiniest glimmer of hope that you can hotfoot it into hyperspace and to a friendly base before the enemy finishes you off, creating this absolutely wonderful tension that is something else that had no right being present in anything developed for an Atari home computer in 1979! Offense is the best defence though, so let’s see about taking the fight to the Zylons instead! Once we’re all occupying the same territory, a red alert is going to sound as you drop out of hyperspace, telling you they’re still there and you actually made it to where you were aiming for – I forgot to say earlier that unless you’re on Novice, you need to keep your ship pointing in the right direction when you jump while it’s getting battered by, er, space winds or whatever, which gets tougher as you go until it’s a real wrestling match at the highest difficulty, making it very easy to end up in totally the wrong sector instead, and as you’d expect, that’s always going to be when you’re almost out of energy and trying to reach a friendly starbase with its final drops, or you’ve got mere seconds left before one gets swamped! Assuming you’re in the right place though, at this point, that Long-Range Sector Scan view might come in useful, with “might” being the operative word because I still haven’t really got my head around it!

I can sometimes get to where I need to be with it though, so I’ll have a go all the same! You’ve got a top-down view of the sector with your ship in the middle, with enemies and meteors shown as flashing blips that are bigger than all the other objects you can see, which are stars. You need to select your target, then rotate the view so it’s in front of you. From there, you need to move the stick forward or back until the target is as far away from you as possible on the screen, somewhere near the top, which is the bit that baffles me, because you can now increase your speed and travel towards it, making minor directional adjustments as necessary as you go, until it’s right there in front of you in shooting range. In theory! Alternatively, just spin around until you make those Greek symbols all go zero! Either way, we now want to turn our attention to our attack computer display, which appears at the bottom-right of the screen in the forward view with a simple press of C, and works just like the one from the trench run in Star Wars – you could even be forgiven for thinking the generic enemy ship shape used on it looks just like a TIE-Fighter too! There is a bit more to it here though, with three subtle but really useful indicators that show when your photons have a vertical and horizontal lock, and are also in range, then you can fire away to your heart’s content until it goes boom, in relatively spectacular fashion too as it explodes into a trail of debris! Actually, when things get a bit more frantic at higher levels and there’s stuff exploding all over the place (again, relatively speaking), you’ll notice limits being properly pushed and a bit of slowdown, which is pretty minimal all the same and somehow even adds to the drama.

And what drama it can be, albeit a bit random! For example, sometimes you’ll track down an enemy (or vice versa) and the fight will be over before its “super-scaling” (of sorts ) has turned it into anything more than a blob of pixels in the distance. However, sometimes you’ll have this prolonged game of cat and mouse as it darts around, sticks and moves, gets joined by a friend and they’re both switching between attacks from the front and then behind and then all at once, as you wrench the stick around in all directions with one hand and desperately switch between views with the other. It can be fantastic but again, I think there’s an element of chance in how the enemy is programmed to behave. What a sense of achievement all the same though, and even more so as you pull off a kill from the aft view with no computer aids available and its more limited targetting sights, as well as the controls being effectively reversed! However it happens though, clear out all the enemies in your sector and your job there is done, so it’s onto the next. There are actually three types of enemy you’ll encounter, the most common of which is the TIE-Fighter one from your attack computer (officially called a Zylon Fighter), a high-speed little meanie that can do serious damage if you let it get close. There’s also a Zylon Cruiser, which is like a big upside-down V-shape that will often have an assigned patrol route across a sector, and will leave you alone until you start poking around at it. Finally, there’s the Zylon Basestar, like a giant, sinister hamburger with a tiny bit of meat in the middle, and these aren’t good news! You need to get right up close and into the danger zone to make any kind of impression on their shields, and you really don’t want to be hanging around in there!

You really don’t want to be hanging around anywhere though, and not just for a fancy ranking at the end, because while you’re messing around trying to work out how a long-range scanner works, or carefully locking-on rather than just getting the thing in the middle and wildly shooting, or dancing around a wannabe Death Star, the rest of the galaxy is going about its business in real-time around you! This means that other Zylon attacks will be forming, or other starbases will be being surrounded or even attacked while you’re occupied elsewhere, and there’s really nothing more heartbreaking than stubbornly limping in and out of hyperspace to try and finish off some particularly unrelenting enemy squadron while you’re energy painfully plummets and your shields are totally gone, only to suddenly get a radio message telling you a starbase has been lost! Fantastic feeling when you make the save in the nick of time though, at least until you realise that doing so has thrown your previously carefully laid out plans of attack right out of the window! And the same goes for the times when you’ll just stare at the Galactic Chart, totally covered in enemies and with way fewer starbases than it started with, and wonder how the hell you can still survive this, but you do, and it’s marvellous! I just reminded myself I was going to come back to that Sub-Space Radio, which I think is the same radio communications system that also ensures your Galactic Chart is always updated – it certainly seems to affect that if it gets damaged. And I think only leaves me with a quick summary of the different mission difficulty levels left to do… Novice has you taking down twenty-seven enemies going after three starbases with no damage taken to your starship. While it’s clearly for beginners, I must admit if I fancy a quick, mindless blast of something while it’s halftime in a football game I’ve got on the TV then this is also ideal for that! Damage taken, along with general mission difficulty, time to play plus everything else we’ve looked at, then ramps-up as you move through the levels, first into Pilot difficulty, where you’ve got four bases to look after against thirty-six enemies. I’d say that if you want an enjoyable thirty minutes or so where you need to keep your wits about you but want to go for one of the higher end of mission rankings then this is a good place to do it. For long-term challenge though, you want Warrior, with five bases and forty-five enemy units that really don’t mess about – this one is tough to beat so you can forget about those rankings when you’re done altogether because the chances are you won’t be around to worry about them! And that goes double for Commander difficulty, with six bases and fifty-four enemies that just attack constantly and relentlessly; it’s really fun while it lasts though!

I reckon that fun could last a lifetime too… Especially when you’re not coming to it nearly half a century late! It’s funny but for all the things I think I eventually came back to here, I’ve still barely mentioned how the game looks but there’s really barely anything there! But what’s there is perfect – exactly the Star Wars-esque lines and shapes and simple prompts your imagination needed (and still needs) to complete that incredible immersion this incredible game has created against all the odds, and years before its time. Exactly the same goes for sound too, with exactly the shrill beeps and blips and bits of white noise you’re probably imagining. It’s always enough to fill in the blanks though, so you can focus on being in space and being Luke Skywalker and Han Solo all rolled into one, with all the exhilaration and tension and helplessness and relief and glory that somehow miraculously entails… Not to mention somehow successfully mixing depth and strategy with accessibility and simple but frantic arcade fun like only a handful of gaming’s greats have also done since! Outrageous! As far as I’m concerned, this game had no right to exist in 1979 when us mere mortals were still in awe of Pong-a-likes, but I’m sure glad it did, and I’m even more glad I found it in the end because I love it and it’s very quickly established itself as an all-time favourite. And no regrets either, because whatever is left of this here lifetime, there’s no doubt I’m going to keep having fun with it!
Before I give my customary passive-aggressive end of feature request for money, I want to give a quick shoutout to my friend Gary Arnott for the incredible picture he did for me that you’re now looking at here! Right when I first started playing the game, he sent it to me totally out of the blue after I’d mentioned how taken I was with it and it blew my mind… Just a shame that two of his previous works took up the last remaining wall space in my office or this would be joining them! He’s not just a talent either but a real nice guy on top, so give him a follow, @GaryArnott on X if you’re still on there – both him and his crayons are always up to something worth seeing!
And with that, as always, I’ll never expect anything for what I do here but if you’d like to buy me a Ko-fi and help towards increasingly expensive hosting and storage costs then it will always be really appreciated! And be sure to follow me on Instagram, X (formerly Twitter) or Threads for my latest retro-gaming nonsense!
